August 31, 2011

Choosing the Right Sprinkler Timer

There comes a time when your sprinkler timer seems to kick the bucket. If it's one with a dial, the sensors on those seem to go screwy after a decade or so. The buttons on other become rusted or difficult to press or just quit working altogether. Sometimes the screen malfunctions and the digits begin to fade. Some times you get lucky with an Orbit Timer that lasts your entire lifetime but if you are on the market for a new sprinkler watering controller, here are some things to keep in mind.

Brand

Chances are, you're going to hit up your local Home Depot and look at their selection of sprinkler controllers and timers. You will be faced with a few different choices. One quick way to narrow it down is to decide on a brand.


As you shop around you're going to find that there are a few different brands that make very similar looking timers. Some brands include:

  • Orbit
  • Hunter Industries
  • Toro
  • Melnor
  • Vigoro

But which should you choose? Let's look at some reviews:

This review is from: Melnor 3015 6-Cycle Electronic AquaTimer Digital Hose Timer (Lawn & Patio)
"Considering how much landscaping costs, there's little reason to scrimp on timers. I learned this the hard way, coming home from vacation to find my yard brown and parched. This timer, which was less than a year old had failed, and as a result, so did my grass.
I'm now in the market for a new one that actually works."
This review is from: Toro 53787 Ecxtra 6-to-8-Zone Sprinkler Timer with Software and Module (Lawn & Patio)
"The controller itself is solid and is a snap to install and set-up. The software and timepod are a great concept but suffer form horrible execution. By themselves, I would give them 1 star. They are supposed to be releasing new software shortly (the current software is copyrighted 2004), which will hopefully address the stability and feature issues."
This review is from: Orbit 57096 Super-6 Controller with Remote (Lawn & Patio)
"I've used Orbit in the past and have controllers that have lasted many years. I've purchased multiple high-end, much more expensive Rainbird units that never had lasted more than 2 years."
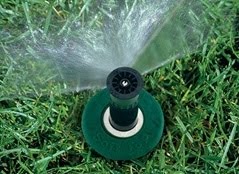
Rain Sensor

If you live in an area that gets a lot of rain, you could save yourself a lot of money if you go with a sprinkler timer that is compatible with a rain sensor or that has one built in. Rain sensors allow for the timer to be able to tell if it has rained recently. If it has, it will not tell the sprinklers to turn on because the lawn is already wet. This is an awesome feature that a lot of people are impressed by. While you're at it, look for a rain/freeze sensor combo so your sprinklers know to shut off in freezing temperatures!

Hose Faucet Watering

If you don't have a huge lawn or are not equipped with an underground sprinkler system you can always go with a Hose Faucet Watering system. Orbit makes timers that make hose watering a breeze.

Afraid you're going to forget to turn off the hose? Problem solved!

Here's what people are saying.

This review is from: Orbit 91213 One-Dial Garden Hose Digital Water Timer (Lawn & Patio)
"This is the best water timer we have ever had! It is so simple to program and one can easily make changes. We love it!"
This review is from: Orbit 91213 One-Dial Garden Hose Digital Water Timer (Lawn & Patio)
"I water the horses 4 times a day. The Orbit One-Dial Water Time takes care of that for me now! It frees up my time for other chores. It was easy to set up and easy to override if I need to. I love it!"

Consider Everything

Before you settle on a timer, make sure you've done your research. There are hundreds of options and even more reviews at your disposal.
Consider:

  • Brand


  • Rain Sensor


  • Indoor or Outdoor


  • Remote Control


  • Number of Zones


  • Hose Faucet Watering


  • August 29, 2011

    Finding Sprinkler System Leaks


    When your sprinkler system springs a leak, you need to find and repair it as soon as possible. Finding irrigation system leaks can be difficult but it is important to do so quickly. Leaks in lawn watering systems are one of the toughest to locate. Sometimes, they can be much further away from water seepage than expected.

    Sprinkler Pipe

    You first need to know what kind of sprinkler pipe your yard irrigation system uses. There are several different types of sprinkler line that can be used including:
    • PVC – PVC pipe is white and usually connected with pipe glue or cement. It can also be connected using Teflon or other pipe tape.
    • Copper – Copper sprinkler pipe is durable and long lasting. It has a reddish hue.
    • Galvanized – Galvanized irrigation line looks like rusty pipe. Like copper, it is strong and provides many years of use.
    • Poly – Poly pipe is a flexible pipe. It is also known as funny pipe and is used for areas that are curved or have interesting shapes.
    You need to know the difference between the type of water sprinkler pipe used in your garden sprinkling system because some types of irrigation pipe must be completely replaced while others can just be repaired.

    Find What is Leaking

    You first need to find out what exactly is leaking. To find this, take a look at your water meter and see if the trimeter is moving.
    The trimeter is the smaller meter located in the center of the larger meter. If it is moving, you have running water that is running from the meter to your home.

    Turn off the water at the main valve where water enters the house. This cuts the water supply to your house and can answer a few questions (the water that is making the meter move is not a toilet or dripping faucet, etc).

    Now that you have turned off the house's water supply, take a look at the water meter to see if the meter or trimeter are moving. Next, locate the main water Orbit sprinkler valve.
    It should be located in a valve box in the ground or in a flower bed. Turn off the sprinkler system's main valve.

    Take another look at your water meter. If it is still spinning, you have successfully determined that your leak is located in the main water line.
    There are few places that are best to check to further locate the water leak. These include:
    • Where the meter is connected
    • Where the sprinklers are connected
    • Where the house is connected
    Then, look at the wet spot where seepage is occurring.
    Check the ground slope and find the highest point that is still wet. Follow the slope downward until the ground gets softer.
    Start digging for the sprinkler line and be careful not to dig too hastily as you may damage the water line. The irrigation sprinkler line should be within 18 inches of the ground level.
    If you have not found the sprinkler pipe after digging 18 inches deep, look to see where the water is seeping. Start digging in that direction until you find the leak.

    Now that you have completed the most difficult part – locating the leak – you can take steps to repair it.

    August 26, 2011

    Adding Sprinklers to Your Landscape


    If you have added additional square footage to your landscape or have made recent changes to your yard, you might need to add more garden sprinklers or an additional sprinkler station. Creating a new sprinkler zone does not have to be difficult.
    First, measure the size and shape of the area where you are adding water sprinkler heads and draw it out on graph paper. From your measurements you can determine what type of irrigation sprinklers you need to install.
    The type of yard sprinkler head you install depends mainly on the size of the area where you are installing them. If you have a larger area, you will need impact heads or gear drive sprinklers.
    Large-sized areas are larger than 25 feet by 25 feet. Depending on the sprinkler head type you choose, they should be spaced between 15 and 45 feet apart.
    If your new landscape area is of medium size – less than 25 feet by 25 feet – the area will be best served by pop-up sprinkler heads. Generally, spring-loaded pop-up sprinklers come in two different varieties: fixed spray and adjustable spray.
    Fixed spray pattern pop-up heads come in spraying patterns such as full circle, half circle, quarter circle, center strip and side strip patterns. For adjustable spray pop-up sprinkler heads, you can easily adjust the water spray pattern from 25 degrees to 360 degrees.
    If you have planted a new vegetable garden or flower beds, you have several choices for garden sprinklers. You can use small area sprinkler spray heads or you can install a soaker system or dripper irrigation system for that area.
    Ideal sprinklers for small areas like planted areas and shrub beds are bubblers and shrub sprinklers. Mushroom bubblers and shrub heads are great for flooding areas or spot watering areas with trees, flowers and other plants.
    Instead of using conventional sprinkler heads for smaller areas like flower gardens or other plants, you can install a micro irrigation system or even a soaker tubing system. These types of water-conserving systems are easy to install and can easily be added to an existing lawn irrigation system in a new sprinkler zone.
    A soaker irrigation or water drip system allows you to conserve water while keeping your plants and garden areas healthy and thriving. You can easily set up this type of system on an existing water irrigation system.
    Once the sprinkler heads or drip system have been installed, you can connect it to your automatic sprinkler timer. On the water timer, you can easily program a new station to include watering times, durations and intervals for your new landscape area.
    Putting additional lawn sprinkler heads or a new dripping irrigation system with your existing garden sprinkling system can be easy and relatively quick. Since you already have the pipes or hoses set up and the rest of the irrigation system ready, adding these new components is a relatively easy do-it-yourself project.
    Your Orbit sprinkler system can be expanded to include additional sprinkler spray heads or even an Orbit drip system. Make the best of your existing water sprinkler system by adding more sprinklers or connecting a soaking irrigation system.

    August 25, 2011

    Reasons for a Patchy Lawn


    The most frustrating thing for some people is having a beautiful, lush lawn one day and then somehow, they turn their backs for a moment and then realize their lawn has terrible dead spots. If you have found yourself throwing your hands up in the air at the brown patches in your lawn, Sprinkler Juice is here to help.

    What could possibly kill your grass that fast?

    Your problem could be that you're lacking one too many sprinkler heads. If your sprinklers don't overlap, see Installing a New Sprinkler Head for a step by step guide to getting your lawn back on track.

    However, it's possible that your lawn is getting the right amount of water everywhere and some other factor is playing into the destruction of your lawn.

    Dog Pee

    Yep, I said it. Do you own a dog? Does your neighbor own a dog? Did you know dog urine can kill grass? One victim writes:
    "Our female dog is ruining our lawn. Every time she urinates an ugly brown burn is the result a few days later. We cannot control where she goes all the time, although we have a side yard. Does anybody have experience with this. I was hoping for some kind of diet solution. Help!"

    Could this be YOUR problem as well? Green Side Up gives an excellent explanation for why dog urine kills grass.

    All dog’s urine contains urea, a form of ammonia which converts to nitrates. Concentrated nitrates burn plants. It’s as simple as that! The level of urea will vary, with the first morning pee having the highest concentration. Urea can actually be good for your lawn if used in low doses; in fact, it’s a component of many fertilizers.

    If you pay attention, you will see that the area immediately around a dead spot in your grass will actually be dark green and growing well. You would see a similar result if you poured a cup of fertilizer in one spot on your grass. The spot where you poured that fertilizer would probably die, but the surrounding areas would turn dark green. So you see, the problem is not necessarily the pee, it’s the concentration of the urea in the animals’ pee."

    Solutions to your Grass Killing, Dog Pee Problems

    • Water down the pee right after your dog goes potty Or you can just keep your lawn good and wet with your sprinkler system and Orbit sprinkler parts.
    • Train your pet to only go in one area(like a side yard, on the rocks, on a bush you don't like.. on you're spouse's shoe..
    • Make sure your dog drinks lots of water Keeping them hydrated will make them pee more, but it will be more diluted and won't contain as many harmful chemicals.
    • Add an additional teaspoon of Brewer's Yeast to your dog's daily diet
    • Sprinkle a bit of lime over the dead spots This is said to alter the pH of the soil. Lime and dog pee cancel each other out somehow.
    Female dogs' urine is much more potent than that of male dogs. Females also like to stay organized by peeing in the same one or two spots over and over again. So if you have a female pup and your lawn is not showing severe signs of struggle, train your dog now to pee in a safe place or get used to watering down the areas that she's already trained to pee.

    If you are considering getting a dog and love your lawn, consider a male.

    August 24, 2011

    Preparing Your Hose Faucet Watering System for the Winter


    If you have installed a hose faucet connected water sprinkler system, you know how well it works and what it can do for your yard. Just like traditional in-ground lawn sprinkler systems, you need to winterize your hose faucet watering system.

    Since a yard sprinkling system that is connected to a garden hose spigot is different from underground irrigation pipes and other Orbit sprinkler parts, it is important you take the proper steps to prepare your hose faucet connected products for the winter time or off-season. This is relatively simple and takes very little time to do.

    First, you will want to drain out all your garden hoses and any valves or hose faucet connectors you have used for your garden watering system. Make sure all water has been drained from watering hoses and lawn sprinklers.

    Next, remove all your yard sprinklers from the water hoses. There may be excess water that can only be released by removing the sprinklers from the hoses.

    After detaching all water sprinklers from their garden hoses, remove the actual garden water hoses from the hose faucet manifold if you use one. If you do not use a manifold, remove the hoses from the hose spigots.

    If you use a faucet manifold, be sure to let any water drain out. Additionally, if you have additional valves connected to your hose faucet manifold, be sure they are drained as well.

    From this point, you can remove your hose faucet timer for the garden hose spigot and remove the batteries. This is an important step.

    If you do not retrieve the batteries from the automatic water timer, they could corrode over the winter time and ruin the timing device. Not removing the batteries will most likely result in having to purchase a new water timer at the beginning of the next sprinkler season.

    Find a safe and protected place to store your hose faucet watering products. This may be a shed, garage or even in the house.

    To protect your water garden hoses from kinking during the winter season, use a hose reel or water hose hanger to keep your water hoses compactly and neatly stored. For your garden sprinklers, use an organizer that has designated areas for each type of sprinkler.

    Be sure all of those organized areas are labeled: large area, medium area, small area, or by style of spray: oscillating, gear drive, impact, etc. This will help you remember how your above-ground sprinkler system was laid out.

    Also be sure to have your graph of how the lawn watering system was laid out so you can reference it in the coming sprinkler season. For other Orbit sprinkler parts like your sprinkler controller, manifolds and valves, have a designated area for them as well.

    Keep all of your sprinkler parts together in the same general area. This will save you time when setting up your yard sprinklers when the time comes.

    It is easy to disassemble your hose faucet watering system for the winter time by following the simple steps above. If you take the proper steps to maintain and protect your garden sprinklers and Orbit sprinkler parts, your above-ground watering system will last for many years and provide excellent lawn watering performance.

    August 23, 2011

    Sprinkler Leaks

    One thing you want to make sure you do regularly is check your yard for any real wet spots. If you have an underground sprinkler system, chances are, you're going to run into a few problems from time to time. If you are responsible when it comes to taking care of your lawn, you probably go out and weed, mow, edge, prune, and tidy up around your house on a regular basis. Since you're out and walking around your lawn, this is a great time for you to inspect for any leaks.

    Flooding

    Your biggest concern should be not allowing a small leak turn into a huge problem. Regular inspections insure that you catch the problem before it becomes a huge headache and bite out of your wallet.

    Pull Weeds

    A lot of the time, weeds will pop up around your lawn like little devils. While they are pesky and ugly, you can use them as an indicator of a leaky pipe or broken sprinkler valve. In some of the hotter climates, many people deal with Bermuda grass creeping up in and around their lawn. Bermuda grass has roots that go deep into the ground. This is mostly a bad and annoying attribute but can be good for one reason: because the roots go down so far, if you pull it up carefully, the roots will tell you whether or not you have a puddle of water beneath the surface. Other plants can also serve this same purpose. So take advantage of such plants if you have them.

    How to tell if it's a leaky pipe or bad valve

    So let's say you come across an area of your lawn that is really wet; either deep under the surface or right at the top. It could be wet because of the sprinklers, or it could be a leak. Which is it? And how do you tell? Here are some things to keep in mind.
    • Is the wet spot in a shaded area? If it were from properly functioning sprinklers, should it be dried by now, or no?
    • Is there a sprinkler head nearby? A bad valve can cause a section of sprinkler heads to dribble water for hours after the station should be shut off. If you determine your problem is a malfunctioning valve, check out Orbit valves and a video on how to replace sprinkler valves
    • Is the wet spot so wet that the ground is squishy and soft?

    Broken sprinkler head

    A more noticeable indication for all the excess water in or around your yard is a broken sprinkler head. However, if you run your sprinklers in the early, early morning and you never see your sprinklers go off, you'll never see your sprinkler head gushing out gallons of water. Running your sprinklers manually once a week for inspection will allow for you to catch any sprinkler head malfunction.
    So, if you find yourself with a water leak problem, check the heads first because they are the quickest and easiest fix.

    Leaks in your Drip Irrigation System

    Another common location for water leaks is within your drip irrigation system. The small rubber hoses are very susceptible to cracks especially when exposed to sharp rocks, edges, and the sun. Some ways you can tell if you've got a leaky drip line:
    • A trail of water seems to come from nowhere
    • Leak occurs near driveway or around plants
    • Wet area will not be extensive, in comparison to a leaky sprinkler pipe.

    Get it taken care of

    If you find a wet spot in or around your lawn or plants, dig it up and figure out what's wrong. If nothing seems to be wrong with the pipe and the sprinkler head is doing all the leaking, check your valves. It is not difficult to repair a cracked PVC pipe, and replacing a watering valve only takes a few minutes. Get after it before you're whole lawn is flooded.

    August 22, 2011

    Money-saving Tips for Landscaping


    There are many ways to save money when creating a functional and beautiful landscape. You do not have to spend a lot of money to make your yard look lovely. A money-saving landscape does not have to look cheap. In fact, it can look quite expensive.
    First, create an edible landscape. Simply put, use vegetables to create an eye-pleasing landscape that is functional and tasty. Depending on your climate, there are many different vegetables and colors of vegetables that will make your landscape pop. From orange, red and green peppers to yellow sweet corn and tomatoes, you can add color and vibrancy as well as have some savory food for family and friends. Adding fruit trees can also help add color and functionality to your landscape.
    MONEY-SAVING TIP: Look for good deals at farmers' markets and your local home improvement store on fruit trees and vegetable seeds. Farmers' markets may be the best place for organic seeds and if you want to go that route.
    Next, use a water well or rain barrel for your water source. This can create a nice visual element as well as help you conserve water. If you live in an area where it rains a lot, catching the rain in the barrel and then using it to water your lawn and gardens is an excellent way to save money and conserve water. You can easily install drip tubing or irrigation pipe inside the barrel.
    VISUAL EFFECT TIP: Paint your barrel a bright color like red or orange. For a more rustic look, distress the barrel with white paint and sand out certain areas to make it look older. Shop at yard and estate sales for older barrels at good prices.
    Third, use a drip irrigation system for your garden areas and shrubs and trees. Drip watering helps conserve water and you can easily create a water drip system in a few hours for very little money. You can easily convert a sprinkler zone on your underground sprinkler system or install the micro irrigation system on a hose faucet or from a well or rain barrel.
    INSTALLATION TIP: Use a drip  kit rather than buying parts separately. You can get an entire drip system in a box with instructions for simple set-up and operation.
    Last, xeriscape your yard with drought-resistant plants. The word "xeriscape" comes from the Greek word "xeros" which means dry. Xeriscaping uses plants that needs very little water to create aesthetically pleasing elements. Plants such as Greek yarrow and white-flowered poppymallow are ideal. Grasses like Kentucky blue and shrubs such as oleander are also drought-tolerant.
    PLANTING TIP: Plant your drought-resistant flowers and plants with other xeriscape plants that have similar watering needs. This will allow you to save even more water when maintaining your plants.
    You can create a functional and beautiful landscape that will be the envy of the neighborhood without spending a lot of money. It takes very little time and money to create a budget-friendly landscape that will take even less energy to maintain.

    August 19, 2011

    Edge or Mow First?


    People have different ways of doing just about everything. Some water their lawns with an Orbit sprinkler system while others use rain barrels. You might mow your lawn with a lawn mower but some folks in places like Panama cut their grass using a machete. Neither is wrong, it's just a different way of doing it. But which is more efficient? When it comes to mowing or edging first, we can ask ourselves the same question.

    Let's say we mow first

    A lot of people mow before they do anything else. Why? Some people like to mow first because it's the biggest task. They like to knock it out before anything else so they can see they're making progress with their chores or job quickly. But what happens? They mow, then they edge, and professionals or serious caretakers will trim and then blow. Their edging and trimming job made a mess of their driveway and/or walkway so they use a blower to blow it all up into a pile or back onto the grass.

    Is this a wrong way of taking care of your lawn? Not at all.

    A more efficient way

    Most professionals agree that if you edge and trim after you mow, you make a mess with the shavings that can easily be cleaned up by the mower, but it's too late now. If you mow last, the mower will pick up most of the trimmings you've thrown all over the place with your edger.

    But not all the trimming mess is on the grass. . You might be thinking to yourself, "Well sure, the trimmer makes a mess but the mower only picks up the shavings that land on the grass. The shavings are fine if their on the grass." Professional landscaper don't leave shavings on the grass because of a few factors.


    First, Pets like snooping around the yard. They will get the shavings all over themselves and track the clippings all over the place. And second, wind and other natural occurrences can cause the grass shavings to fly all over the place.

    You decide

    There is no right or wrong way. It just depends on your priorities. If you like to mow first because you find that using the weed wacker to get any and all spots you couldn't get with your mower is an efficient way of doing things then great! Maybe you have a method that removes all the shavings from your lawn even though you mowed first. Maybe you don't care if there are grass shavings on your lawn! It's entirely up to you.

    Professional Standpoint

    Professional landscapers will most commonly edge/trim first, then mow second. It must be a little bit more efficient, right? Again, you decide!

    Installing a New Sprinkler Head

    For Small to Medium Size Lawns

    Don't Wait 1 More Minute

    If you have a patchy lawn, or maybe you've just started to notice one spot is going a little dry, now is the time to do something about it.


    The Solution

    A lot of times, the first idea that comes into people's head is that the lawn needs fertilized. They've checked their sprinkler system and all is working just fine and the whole lawn appears to be getting water. It must need fertilizer, right?
    Wrong.
    If you've already fertilized this season, DO NOT fertilize again. Fertilizing is a one time thing during the summer months.
    The real problem: The patch of dying (or dead) grass is not getting enough water. You might think that because it's getting wet when the orbit sprinklers are on, water is not the issue.
    Here's an effective rule to go by: Overlap. If a section of grass is not getting sprayed by two sprinklers, it is in jeopardy. Refer to the diagram to the right. You are experiencing a/many dead spots because you have too much space between two or more sprinkler heads.

    The Good News

    Lucky for you, installing more sprinkler heads is not that difficult. First timers may struggle a little bit. It is always best to have someone show you how to do something like this, but for those of you that are self learners, here's a bit of a guide for you to go by.

    What you'll need

    First thing you're going to want to do is figure out where the new sprinkler head is going to go. With dead spots, it is probably a good idea to go with a "dead on" approach which means using a 45 degree spray setting rather than a 90 or full 360 degrees. You want to target the dead spot directly. Now, if the dead spot is large or there are multiple dead spots right next to each other, instead of installing more than one sprinkler head you could use a head that sprays 180 degrees, etc. It all, of course, depends on your situation.
    However, installing a sprinkler head is almost always going to be the same procedure no matter how big or how many dead spots you have.

    Materials

    Hand Shovel

    PVC Cement

    PVC Primer

    Pipe Cutters

    PVC Tee

    Sprinkler Riser

    Sprinkler Head

    Installing a Sprinkler Head, Step by Step Guide

    1. Turn the main water supply valve to the off position. After you've estimated where the new sprinkler head is going to go, locate the nearest already installed sprinkler head to that point.

    2. Dig straight down from the sprinkler head until you come to the piping. Be careful as you dig because PVC pipes crack easily and if you damage your piping, you will have bigger problems on your hands.

    3. Determine which way the piping goes based on the other sprinkler heads around it. This will give you a good idea of where the piping is at relative to the location you have chosen for your new sprinkler head.

    4. In your head, follow the piping down to the newly targeted are and carefully dig another hole in attempt to locate the sprinkler pipe. Once you find the pipe in a location that a new sprinkler head will be of benefit, dig down and around the pipe to give it lots of space away from the surrounding dirt.

    5. Get a feel for where the PVC Tee is going to go by holding it over the pipe and imagining the sprinkler head straight above it. Do not get hasty and cut into the PVC until you have considered the new location for this sprinkler head thoroughly. You should know without a doubt that this is the best, most beneficial spot for the sprinkler head.

    6. Once you are sure of where the PVC Tee will be placed within the piping, set it on the pipe where you want it to go and use a marker to mark where you need to cut. The pipe should enter a quarter of an inch into the Tee on each side. Be careful not to cut too big of a chunk out of the pipe. Using the PVC Pipe Cutters, start with a small chunk, then cut out a little more if needed. Once you cut too much, there's no going back. So start small.


    7. Now, open both the jar of Purple Primer and the Cement and prepare them for use. Notice the lid has a cottom swab attached. That is what you use to spread the contents onto the PVC.

    8. First is the Purple Primer. Place a layer onto the inside of the two bottom holes of the PVC tee then onto the outside of the two edges of the pipe that is underground. Make sure to get the bottom really well.

    9. Quickly do the same thing with the cement, spreading on a nice even layer over the Purple Primer. Slide the pipe ends into the Tee nice and snug. Make sure the top hole is pointing straight up.

    10. Screw in the sprinkler riser to the top hole of the PVC Tee. Cut off any unneeded sections.
    Note: Do not bury the pipe until you have the riser on the correct setting and the cement has dried.

    11.Screw sprinkler head onto the riser. Run sprinklers manually to test and make sure it worked. Make sure the dead spot(s) get lots of water. Adjust sprinkler head accordingly.

    And there you have it! It may sound complicated but once you get going it is mostly common sense.

    Hardscaping can Reduce Water Usage

    Create an area for a fire pit in your yard
    If you are looking to conserve water and live a "greener" life when it comes to your yard, you may want to consider hardscaping as an option in your landscaping efforts. There are many different forms of hardscaping from rock gardens to brick paver patios.
    Rather than having large areas of grass, clover or large flower beds, creating a sidewalk and patio in your yard can add form and function as well as help save water. Installing a barbecue area or fire pit can also add to the aesthetics of your yard while reducing the ground cover or areas that need to be watered.
    Eco-friendly living entails many different aspects from recycling to saving wherever you can. Conserving water is yet another way to be kinder to the environment and your wallet and hardscaping can help you achieve an eco-friendly lifestyle.
    Make sure sprinklers are free of debris
    For the areas of your yard where you do need to water, it is important to have an effective automatic sprinkler system. You can achieve water conservation with a lawn irrigation system that runs on an automatic irrigation controller and that uses pipes and sprinkler heads that are free of debris and grit. Also, using recycled water to run through your water sprinklers can help you achieve a more earth-friendly lifestyle.
    By using hardscape materials like outdoor patios and gazebos as well as rock gardens and having an efficient Orbit sprinkler system, you can conserve water, save money and allow the environment to thrive more fully.

    August 17, 2011

    Low-maintenance Landscaping


    Caring for a landscape can be a tedious task
    Landscaping your yard does not have to take a lot of time for it to look good and be functional. There are many different ways to landscape that are low maintenance. Though it is impossible to have a no-maintenance landscape unless you have no landscape at all, low-maintenance landscaping is easy to achieve. There are many ways in which you can cut the time you spend caring for your yard by using some of these low-maintenance landscape ideas:

    • Xeriscaping is an excellent way to reduce the time you spend tending for your landscape. Xeriscaping uses less water and requires little to no mowing. Xeriscape plants require less water while still being beautiful and functional as part of your landscape.
    • Automatic watering systems are an excellent way to reduce the work you must do in order to keep your landscape maintained. Rather than spending time manually watering your landscape, you can easily create an automatic irrigation system using Orbit sprinkler parts.
    • Using moss or clover in place of grass is yet another way to reduce yard maintenance. Clover is resistant to drought and insects and is budget-friendly. Moss can be used in shady areas where grass has difficulty growing.
    • Mulch is yet another way to save yourself some yard work. It needs a lot less water than grass and if you want, you can even make your own. Mulch is a simple solution to problem areas in your yard.
    • Some perennials are drought-tolerant
    • Perennials can be low-maintenance as well. You can easily find drought-tolerant perennial plants that are beautiful and easy to maintain. There are a variety of these water-conserving flowers that will make your landscape pop with color.
    • Rock gardens are becoming a more popular way to landscape. They function as lawn art and take away a lot of yard work. Rocks do not need water to survive and you can use low-maintenance plants such as cacti or perennials to supplement color into your rock garden.

    There are many ways in which you can easily create a low-maintenance landscape and spend more time enjoying your yard than actually working in it.


    August 16, 2011

    How Vegetable Gardens Benefit from Drip Watering

    Vegetable gardening is growing ever more popular because of the tough economy. Gardens require a lot of care such as weeding, watering and much more. For your vegetable gardens and flower beds, drip irrigation may be the best watering route you can take.
    Water drip systems allow you to direct water straight to the sources where it is needed. Rather than wasting water with conventional lawn sprinklers, you can give your plants and vegetables the water they need at a fraction of the cost.
    More than that, you can easily set up a dripper irrigation system on an automatic timer to further help save you money and conserve. You won't have to remember to turn the water on or off and, if programmed properly, your drip system timer will make sure to water efficiently without taking up your time and energy.
    Setting up a micro irrigation system is easy as well. It can be a quick do-it-yourself project that takes only a matter of hours. In one day, you can have a soaker system or drip system that is more effective than a traditional garden sprinkler system.
    Vegetables, plants and flowers can greatly benefit from having their own dripping irrigation system and you can create your own micro sprinkler system with Orbit sprinkler parts that are cost-effective and easy to use.

    August 15, 2011

    Summer Squash

    How to Grow Summer Squash

    Fun Fact!

    Before we get into the "How-To" of growing Summer Squash let's define it a little bit and clear some confusion concerning this popular crop.

    Vegetable or Fruit?

    According to Wikipedia All Summer Squashes are from the "fruits" of the species Cucurbita. However, in terms of their culinary use, they are considered to be vegetables.

    So there you have it.

    When to Plant Summer Squash

    The best part about growing squash (and the reason it is such a popular vegetable harvest) is because the entire process is quite simple. Squash pretty much grow themselves with the tiniest bit of help from the gardener.

    First

    • It is called Summer Squash for a reason. Squash thrives in the summer and dies in the winter. The best times to plant are mid spring and late summer. Experienced planters will raise squash during those 2 times every year, each time with different crops.
    • Since you will be growing the squash during the summer months, make sure they are getting plenty of water. We recommend you use Orbit Water Sprinklers for all your watering needs.
    • If you are inexperienced, growing Squash all on its own is a great way to start. Most people will grow it with other plants because it requires little work so they can focus on the other crops and not worry about the squash too much.
    • You will have the most success if you plant Squash in loose soil with heavy drainage. This means that you must prepare your soil by loosening the ground and implementing compo-stable fertilizer.

    Summer Squash Maintenance

    Thinning

    • Thinning; while it is probably the only hands on labor squash requires, it is very tedious and should be done properly and carefully. Generally, thinning is the process of decreasing the amount of crops you have so that you end up with bigger, healthier crops.
    • Below is a snippet from a Mississippi Gardening Site that gives fantastic thinning instruction.
    • When sowing small seed, cut or tear off a corner of the packet and scatter seed in furrow while tapping gently with index finger.

      Seeds that are large enough to handle easily can be planted in groups (hills) or spaced evenly (drilled) in the row. When planting in hills, place several seeds in small areas at the desired final plant spacing.

      Sweet corn, squash, pumpkins, melons, and okra are often planted in this way. Once the seeds germinate and the seedlings are established, remove the excess seedlings. Sweet corn, okra, and summer squash are thinned to one plant per hill, pumpkins and melons to two plants per hill.

      After germination and seedling establishment, remove extra seedlings. The choice of planting method, drill or hill, for many vegetables is up to the gardener.Removing the extra seedlings (thinning) seems wasteful to many gardeners, especially new gardeners. However, when the majority of seeds germinate and the seedlings survive, the plants become crowded. Leaving the plants spaced too closely together reduces yields, makes the plants more susceptible to disease, and generally starves the plants for water and nutrients.

    • So you see why it is so important. Don't think about it too hard, just go through and make room for the stronger squash to grow nice and big.

    You want your squash "Immature"

    The thing about squash is that they mature super fast. The difference between a mature squash and an immature squash can literally be a matter of days.

    The best, most tastiest squash is harvested just before it matures. Watch your crops carefully; squash is usually ready once they are 2 inches in diameter and 8 inches long.

    Beware of Cucumber Beetles

    Cucumber Beetles can be a nightmare to any squash grower. There are a number of ways to combat them but one very popular method is simply to plant radish seeds right in the hills with the cucumber(squash) plants.

    You can also pick up some Eco-Friendly pesticides to prevent Cucumber Beetles from being a problem.

    August 12, 2011

    Start to an Eco-Friendly Life

    Making your Lawn Eco Friendly

    More and more people these days are making the switch to the Green side of life. Some people believe Global Warming is real and want to do their part to make sure the Polar bears in Greenland aren't drowning in their own backyards. Some people like the idea of going green because it helps the environment; their ecosystem, habitat. My guess is that you are one of these people and you want to find out how you can take care of your lawn without harming the world around you.

    You've come to the right place.

    What You'll Need

    • A Push Lawn Mower. Ditch your fancy 5 speed, gas powered, self propelled Honda Titan Lawn Mower 6000 for a humble push mower than doesn't require any gas. They're known as EcoMowers and they're awesome and affordable.
    • Organic Pesticides. I know you've got some Round-Up sitting in your garage, half empty from your previous uses. Don't be ashamed, we are all human. What's important is that you're making the switch and that you can find Natural Pesticides on the web or at Wal Mart.
    • Orbit Sprinkler System Parts. You heard me. I have been using Orbit Products for a very long time and they have a fantastic variety of Eco-friendly supplies that even your mother would be proud of.
    • Eco-Friendly Fertilizer I bet you didn't even know there was such a thing or maybe you didn't know the fertilizer you use each year is harmful to you and your children. Well, it's not all that bad but if you want to keep your dog safe with an organic yard, you have got to get yourself some new Lawn Fertilizers for Hal's sakes.
    • Now that you've got all the physical essentials all it takes is a little bit of determination and a sound mind to keep on your yard organically.

      Watering Your Lawn As A Changed Individual

      Being 100% "organic" and "natural" is not all it takes to have a resourceful and eco-friendly backyard. Deep down you know you water your lawn more than it really needs to be. How can you be spoiling your lawn with so much water while Human Beings suffer from a terrible drought in Australia If you are going to give back to mother nature, you should only be watering your lawn 3-4 times a week.

      One Final Tip

      Grass does not need to be mowed every week. Don't be afraid to go 2 weeks without mowing your lawn. That's just fine! Mowing your lawn so frequently is a waste. Let that grass grow. It absorbs and retains water much better when it's 4 inches high.

      And! Try not to cut the grass down really low. Some people like a buzz cut on their lawns. If you do that, the grass requires a lot more water and we already talked about how you should water your lawn less than you need too. Don't make me repeat myself.

      Other than that, you are well on your way to treating your lawn with all natural care. Good on ya, and good luck!

    Using a Portable Mist Stand for Cooling Pleasure

    Cobra misting stands are easy to use.
    Summer can be a daunting time of year with high temperatures. It really makes a person not want to go and enjoy the beautiful sun and get much needed vitamin D. Fortunately, personal misters are one excellent way to spend time outdoors during the summer without being overwhelmed by the heat.
    One of the best portable misting systems out there is the flexible mist stand. Misting stands, which are also called cobra misters, attach easily to a standard garden water hose to provide endless cooling pleasure during the hot summer.
    Flexible mist stands are portable.
    Flexible misters not only reduce outdoor temperatures by up to 20 degrees Fahrenheit, they easily wrap around tree trunks, umbrella stands, chair arms and can even stand on their own.
    Cobra personal misting systems are extremely portable. They can be coiled up and put in a bag or purse for easy transportation. Another great benefit of flexible portable mist systems is that they can be used anywhere that has a garden hose. Whether you are attending a neighborhood barbecue, family get-together or party in the park, you can use a viper mist stand as long as there is a watering hose available.
    Misting stands are great for pets.
    Misting stands are excellent to use at your own home as well. If you are barbecuing for the family or friends, working in the garden or sunbathing, having a portable mister is ideal.
    They are even great for your pets when they are outside as well. If your dog or cat wants to lounge outdoors while you enjoy some sun rays, you can have a personal mist system for them too.
    However you choose to use your portable misting stand, you cannot go wrong by having one at your house, in your car and carried with always to ensure a cooler, more pleasurable summer. Enjoy the summer more fully by spending time outdoors. You can do this with an Orbit personal misting system that is portable and simple to use.

    August 10, 2011

    Automating Your Drip Irrigation System with a Hose Faucet Timer

    Use a hose faucet watering timer.
    Drip watering has become a newer trend among homeowners who are trying to save money in this difficult economy. One more way to help save money and conserve water is to use a watering timer to automate a water drip system. Many drip systems are installed on a standard garden hose spigot and hose faucet watering timers are ideal for automating these types of micro irrigation systems.
    Automatic irrigation controllers allow you to set drip sprinkling times, watering durations and intervals without having to go outside and do it manually. You can free yourself from the hassle of attending to your garden watering with a hose faucet water timer.
    Automatic water emitters save money.
    Essentially, your dripping irrigation system can become even more effective than it already is in saving you money and conserving water with dripper automation.
    Automatic micro sprinkler systems are ideal for areas with arid climates. They allow water to penetrate directly to the source without evaporation that occurs with traditional lawn sprinklers.
    Drip watering is perfect for watering gardens, potted plants, hanging flower baskets and flower beds. If you are ready to make the conversion to an Orbit drip irrigation system, be sure to consider using a drip system timer to automate watering.

    August 8, 2011

    Converting Your In-ground Sprinkler System to Drip Irrigation

    If you have a conventional underground lawn irrigation system and want to convert it to drip irrigation, it is completely possible and very easy to do. Dripper irrigation systems help conserve water and you can save more money in this tough economy.
    Making the conversion to drip watering is quite simple. You do not have to convert your entire in-ground yard sprinkling system; you can simply convert the sprinkler zone(s) that have gardens, shrubs and plants. Drip sprinklers are not ideal for larger areas as you would have to place micro sprayers so close together you would spend a lot more money and time for installation. Doing that would not be practical so conversion to dripping irrigation should only be done in areas with potted plants, flowers and other garden areas.
    To convert your traditional automatic sprinkler system to a water drip system, you need a few essential sprinkler parts:

    • Adapters
    • Pressure regulators
    • Manifolds
    • Drip tubing
    • Hole punch tool
    • Micro sprinklers
    • End plugs
    In the sprinkler station(s) where you are converting to micro irrigation, remove the sprinkler heads from the sprinkler head risers. Attach drip adapters with pressure regulators to regulate water pressure at 25 PSI. Any higher water pressure can damage your garden watering system. From the adapters, use drip manifolds to attach sprinkler drip line. Route the drip irrigation tube down your garden and flower bed rows. With a hole punch gun, punch holes to attach water emitters where you need them.
    Before connecting the drippers and mini sprinklers, flush the lines to make sure there are no drip tube fragments or debris left inside. Tie off the ends or use end plugs to cap off the irrigation drip line to maintain water pressure.
    Install the water drippers or micro sprinklers in the holes you punched. From your automatic sprinkler timer, test the sprinkler zone(s) where you converted to a water drip system to make sure water is flowing correctly, water pressure is accurate and the emitters are working properly.
    Reprogram those sprinkler station(s) on the watering timer to effectively water your gardens, plant areas, shrubs and flowers.
    This do-it-yourself drip system project is simple and quick. You can have a water-conserving drip irrigation system without spending a lot of time or money.

    August 4, 2011

    Choosing the Right Sprinklers for Above-Ground Lawn Watering

    Hose faucet watering is becoming more of a trend among homeowners. It is easy to install and operate while taking less time to do so. Another benefit is that an above-ground watering system does not require digging up the yard. Though it may look a bit unsightly, a hose faucet sprinkler system is a wonderful alternative to an in-ground irrigation system. An above-ground sprinkler system is cost-effective and can be fully automated just like an underground lawn watering system.

    To fully automate a hose faucet irrigation system, you can attach a sprinkler timer to the garden hose spigot. To make a single hose faucet into a multi-zone sprinkler system, you can use a hose manifold to add more water hoses to the garden hose faucet.

    From each garden water hose, lawn sprinklers can be attached. There are different types of water sprinklers for any size area of the yard. Larger areas are best served by oscillating sprinklers that cover up to 3,600 square feet. Water oscillators are perfect for large backyards and large play areas.

    Medium-sized areas can be watered by gear drive sprinklers and impact sprinkler heads. With area coverage up to 65 radial feet, both impact heads and gear driven rotor sprinklers are ideal for side yards and front yards as well as medium backyards.

    For smaller areas with trees and shrubs, bubblers and shrub sprinklers are perfect. These types of sprinkler heads flood areas with water and put water directly at the sources where it is most needed.

    Above-ground sprinklers are wonderful for budget-friendly do-it-yourself projects and work well for any size yard. You can have a beautiful lawn and gardens with an Orbit sprinkler system.

    August 2, 2011

    Choosing a Lawn Watering Style for Your Yard

    The hot summer sun can easily and quickly ruin your flower beds, vegetable gardens and grass. In order to keep your lawn and garden areas alive, a yard watering system of any kind is a must. Whether you choose underground irrigation, hose faucet watering, soaker irrigation, drip watering, hand watering or a combination of these lawn watering styles, you must have an efficient system to keep your yard thriving and healthy.

    There are benefits and hindrances of each type of garden watering. Let's take a look at the pros and cons of each irrigation system.

    • can be fully automated
    • are relatively easy to install
    • save money and conserve water
    • can be costly if not maintained properly
    • take time to design and install

    Hose faucet watering systems
    • are quite inexpensive
    • do not require any digging
    • can be fully automated
    • are easy to set up and operate
    • look a bit unsightly
    • can get damaged easily by lawn equipment and foot traffic

    • easily connect to an underground sprinkler system or garden hose spigot
    • conserve water and save money
    • can be fully automated
    • work wonderfully for gardens and plant areas
    • are easy to install and operate
    • cost less money that traditional irrigation systems
    • can get damaged by foot traffic or garden tools
    • can get clogged easily
    • can easily blow out if water pressure is too high

    Water drip systems
    • are cost-effective
    • can be fully automated
    • take up very little space
    • are perfect for vegetable gardens, potted plants and flower beds
    • are easy to install and operate
    • conserve water
    • can be easily damaged by gardening tools or foot traffic
    • can clog easily if not properly maintained
    • may blow out and get damaged if water pressure is too high

    Hand watering
    • is easy and cost-effective
    • works well for hanging plants, gardens and flower baskets
    • can be therapeutic
    • takes time
    • can easily be forgotten
    • is not automated

    Lawn watering is extremely important. There are so many different ways you can water your yard to keep it beautiful and healthy.